The technical process of renovating the fire channel of a coke oven without removing the roof. The removal and reconstruction of the defect of one or more walls of one or more fire channels below the fire channel cover bricks is called fire channel digging and patching. Since the furnace head and fire channel partition bricks are not removed or not completely removed, it is not necessary to reinforce the top masonry when the repair scope is not large.
Patching of Refractory Bricks for End 1~3 Fire Channels
Preparation work such as heat preservation and heat insulation
① Method 1
Push the empty furnace, open the riser, isolate the raw gas, and do the patching. And set up a retaining wall for heat insulation. The retaining wall can adopt the following three measures according to the repair part.
- You can hang a ceramic fiber blanket from the upper part of the furnace mouth with a thick iron wire, and hang it obliquely to the corresponding fire channel at the bottom of the furnace, and press it with bricks to fix it. It is more suitable for the repair of the end 1 and 2 fire channels.
- Use steel pipes to make a 2m or 3m high active retaining wall, tie the insulation blanket, and push it to the corresponding fire channel in the furnace. It is more suitable for the repair of the lower fire channel.
- After the coke is discharged, use standard refractory bricks to dry-build a one-brick thick sealing wall, and apply a layer of 8~10mm thick and thick clay mud on the outer surface of the sealing wall, as shown in Figure 1. The exposed combustion chamber burner wall is affixed with a 5~6mm heat insulation ceramic fiberboard. It is more suitable for situations where the excavation area is large.
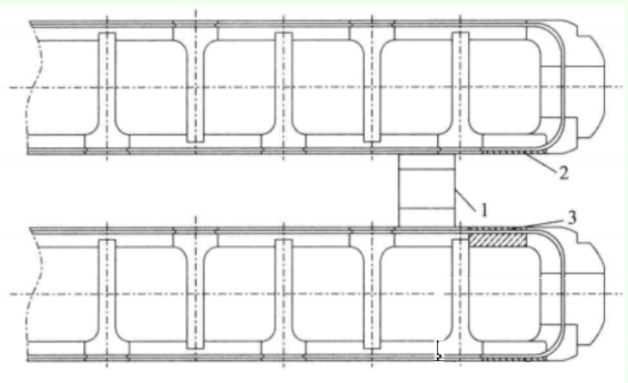
1-Wall sealing; 2-Ceramic fiberboard; 3-Damaged masonry parts.
②Method 2
Remove the coke and dig the furnace head at the beginning of coal loading. When only repairing the furnace head at the lower part of the end fire channel, open the furnace door on the repair side at the beginning of coal loading, remove the coke to the appropriate position, build an inclined sealing wall, and expose the part to be repaired to the outside (as shown in Figure 2). This is conducive to maintaining the temperature of the carbonization chamber and has little impact on production, but the working environment temperature is relatively high, and safety protection work must be fully prepared. The inclined part of the sealing wall is built with one brick thickness, and each layer does not exceed 1/4 of the brick length. When the inclined part is built to the furnace shoulder, the vertical part is then built with half a brick thickness. The inclined sealing wall is built with mortar, and a 5-10mm expansion joint is left near the wall of the carbonization chamber.
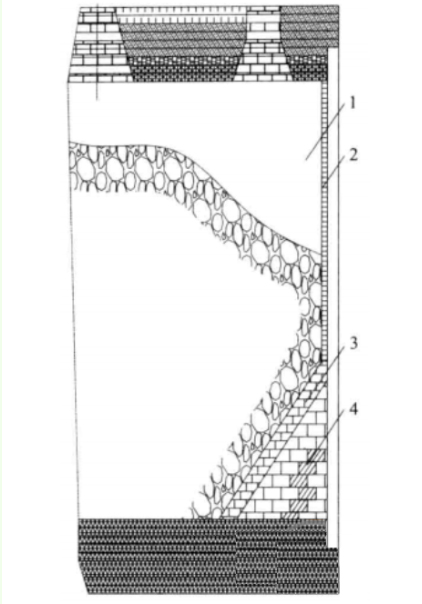
1-Carbonization chamber; 2-Vertical part of the sealing wall; 3-Inclined part of the sealing wall; 4-Damaged part
Treat heating gas in advance
If coke oven gas is used for heating, stop heating the corresponding fire channel of the repaired part, and continue to heat the inner fire channel at intervals to protect the furnace wall. If blast furnace gas is used for heating, heating can be stopped because the repair time is short. If the repaired part is deep, the combustion chamber to be repaired can be changed to coke oven gas heating if conditions permit, and controlled.
Main steps of repair
If the damaged part is at the bottom and the area is small (such as about 2 bricks), the repair time is short, and the size of the damaged part can be measured directly. Clean the fire channel and put the preheated bricks into the hole with mortar. Then point the joints and clean the bottom of the carbonization chamber before the furnace door can be aligned.
If the damaged part is in the middle and upper part, it is necessary to break and remove the 1st to 3rd layer of wall bricks of the pre-repaired fire channel, and remove all the debris in the fire channel and the ramp. Cover the bottom of the fire channel with iron plates or refractory bricks to prevent the bricks that fall during removal from damaging the nose bricks or falling into the ramp. Then use a hammer to remove the defect from the upper part of the wall layer by layer and piece by piece. It is forbidden to hit the masonry with a sledgehammer to prevent damage to the retained part. After the removal, clean the bricks and fire mud that fell into the bottom of the fire channel. Since the junction between the retained masonry and the new wall is not easy to reinforce, in order to prevent damage, the retained masonry is generally not scratched when digging and patching.
Since debris may fall into the fire channel during the masonry process, the first layer of refractory bricks are laid as “live bricks” at the beginning of the masonry. When laying “live bricks”, the brick tongue is generally not cut off, but one side of the brick groove surface is cut off, so as to ensure that the “live bricks” will not be pushed into the combustion chamber when pushing coke. The surface of all new bricks should be kept flush with the old wall surface, and it is strictly forbidden to have reverse misalignment to avoid causing difficulty in pushing coke. When the top of the masonry is connected to the old masonry, one side of the horizontal brick groove of the top layer of new bricks is cut off and then the bricks are built in with plaster. Silicon brick furnaces should leave appropriate horizontal expansion joints (if the height of the excavation is lower than that, it can be omitted), and when the length of the new bricks in the horizontal direction exceeds 1m, appropriate vertical expansion joints should also be left layer by layer. Then pull out the “live bricks”, take out the iron plate and the debris on the ramp, and put the “live bricks” in with plaster. Use drier phosphoric acid mud to tighten the gap larger than 5mm, and use spraying method to compact the small gaps. Then remove the insulation device of the adjacent wall and the checker brick cover, close the furnace door, and use the heat transferred from the adjacent wall to heat up. The temperature of the dug and patched fire channel reaches above 700℃ before the coke oven (or blast furnace) gas can be fed in. In order to prevent the new masonry from splitting due to excessive heating, the retaining wall cannot be removed when the adjacent wall protection device is removed. It should be withdrawn half an hour before pushing the coke after the temperature of the new wall returns to normal, and finally push the coke and load the coal.
One of the key issues in the dug and patching of the siliceous furnace wall and the renovation without removing the roof is whether the expansion joint is properly reserved. If the expansion joint is too large, the masonry will leak after production due to the incomplete expansion. If the expansion joint is not left or is too small, the masonry will be severely deformed after heating. Therefore, sufficient attention should be paid to the reservation of expansion joints.
The size of the reserved value of the expansion joint is related to factors such as the quality of the silica brick firing and the high or low production temperature of the coke oven. For silicon brick coke ovens with zero residual expansion, expansion joints do not need to be left for digging and patching (or renovation without removing the roof) (clay brick furnace walls do not have the residual expansion characteristics of silicon bricks, so expansion joints are not necessary). According to many years of practice, the expansion joints reserved for digging and patching of silicon brick coke ovens currently produced in my country are generally about 0.3% of the length of the new bricks (calculated based on the production temperature below 1450℃).
Expansion joint reservation
In order to solve the problem of horizontal expansion joints being reserved due to the difference in height expansion between new and old bricks, some factories lay a layer of yellow paperboard on top of every 5 layers of new bricks. This can make the masonry expand evenly in height, but it is troublesome to operate and difficult to lay, and the paper ash will affect the sintering of fire mud and bricks. When some factories remove the fire channel and rebuild it, they reserve a total of 4mm in height at the top of the new masonry and fill it with silicon fire mud. Since both fire mud and silicon bricks expand with the increase of temperature, the gaps formed by the evaporation of water in the silicon fire mud slurry alone cannot meet the expansion requirements, which often leads to deformation of the old wall at the top. Other factories fill the top concentrated expansion joints with wooden boards or ceramic fiber cloth or aluminum silicate and high silica fiber of corresponding thickness. These materials are elastic and conducive to the expansion of masonry. As the furnace temperature rises, the wooden boards will carbonize and burn, and their gaps will be filled with masonry. Fibers such as aluminum silicate or high silica will not burn below 1000℃. They will be connected to the furnace wall through the infiltrated graphite, so the expansion joint should be slightly larger than 0.3% per meter.
The vertical expansion joints set up to solve the horizontal expansion difference between the new and old masonry vary with the density of each vertical mortar joint. When the vertical mortar joints are very dense, the expansion joints can be reserved at about 0.3% of the length of the new masonry. However, the operating environment of thermal repair is harsh, and the vertical mortar joints of the masonry are many and not dense, so the expansion joints should be appropriately reserved according to the specific situation. The position of the vertical expansion joint is usually reserved at the junction of the new and old masonry, and filled with yellow paper of corresponding width. If materials such as aluminum silicate or high silica fiber are used, the expansion joint should also be appropriately widened on the original basis.
The smaller the area of the furnace wall to be dug and patched, the easier it is to repair. If the scope of the digging and patching exceeds two fire channels, the fire channel partition bricks must be removed. Usually, the fire channel partition bricks are relatively complete and sintered firmly. When they are removed, other bricks are easily damaged. When new partition bricks are laid, they need to be inserted into the joints, which easily leads to loose mortar joints. Therefore, multi-fire channel digging and patching is generally not used.
Digging and Patching of Internal Fire Channels
Usually, the difficulty of digging and patching the internal furnace wall holes that are more than 6 fire channels away from the furnace mouth is increased. Generally, it is only necessary to set up an empty furnace to patch a wall, and push a movable retaining wall from the furnace door (or put a retaining wall from the coal loading port) to separate the repaired part from the retained part. The number of stewing furnaces and buffer furnaces and the temperature of each fire channel in the furnace repair area are arranged according to Figure 3, which is conducive to the insulation of adjacent walls and unrepaired parts. Except for the fire channel that needs to be dug and patched, the gas supply is stopped and dropped to the working temperature, and the remaining exposed parts can be insulated by the method of renovation without removing the top of multiple fire channels.
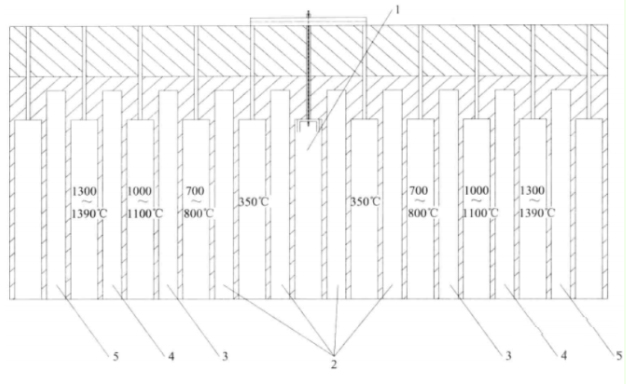
1-Renovation of combustion chamber; 2-Empty furnace; 3-Stirring furnace; 4-Buffer furnace; 5-Normal production furnace
When digging and patching, it is also necessary to cover the bottom of the fire channel with iron plates or bricks to protect the nose bridge bricks and ramps, and remove them after the new masonry is built. There are two ways to take it out: one is to take it out from the “live brick” mouth that was pre-dry-laid at the first layer of bricks in the furnace wall, and then lay the “live bricks” with plaster. The disadvantage is that the “live bricks” are easily squeezed by the coke after being put into production; the other is that when the new masonry is almost completed, the iron plate or bricks are taken out from the top and then sealed. This can avoid the disadvantages of using “live bricks”. However, when the iron plate or bricks are taken out from the top, no more debris can fall into it, otherwise it is still necessary to drill a hole in the bottom layer of the wall to take it out.
The operation method, quality requirements and expansion joint setting of the internal fire channel are the same as those of the end 1~3 fire channel.